> ## Documentation Index
> Fetch the complete documentation index at: https://guide.trycentral.com/llms.txt
> Use this file to discover all available pages before exploring further.
# Setting up the Website Chatbot
> This guide will help you get your AI Chat Agent set up on your website, using the Central's embeddable website chatbot
This guide is for embedding the Central AI Chat Agent into websites and web apps. \
For mobile app integration (iOS/Android), please use a WebView or contact support.
**This guide will cover the following platforms-**
Jump straight to the steps that match your site by clicking on the one that you’re using:
* Plain HTML / Custom CMS
* React / Next.js / CRA / Vite
* [WordPress](https://help.trycentral.com/set-up-your-central-ai-chat-agent-on-any-website-in-3-minutes#WordPress)
* [Shopify](https://help.trycentral.com/set-up-your-central-ai-chat-agent-on-any-website-in-3-minutes#Shopify)
* [Wix / Squarespace / Ghost](https://help.trycentral.com/set-up-your-central-ai-chat-agent-on-any-website-in-3-minutes#Wix)
* [Webflow](https://help.trycentral.com/set-up-your-central-ai-chat-agent-on-any-website-in-3-minutes#Webflow)
* [Framer](https://help.trycentral.com/set-up-your-central-ai-chat-agent-on-any-website-in-3-minutes#Framer)
## **Plain HTML / Custom CMS**
**Step 1.** Locate the page where you'd like to install the chatbot. \
*Or*, locate a common file that is present in all pages (e.g. header.html, footer.html, footer.html, menu.html, etc.) if you want the chat agent to be present in every single page.
**Step 2.** Copy your custom HTML snippet from **Chats** > **Integrations** > **Website** : [https://app.trycentral.com/chats/integrations?provider=website](https://app.trycentral.com/chats/integrations?provider=website)
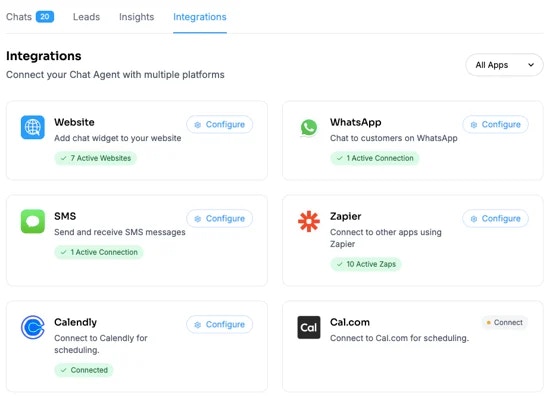 **Step 3.** Paste the HTML snippet in **\** or right before **\
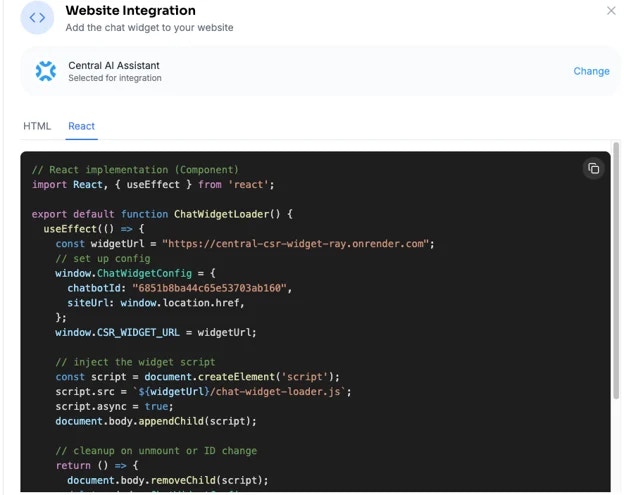 **Step 4.** Find something that ends with `` or `` and paste this line from your snippet right above it:
`
**Step 4.** Find something that ends with `` or `` and paste this line from your snippet right above it:
`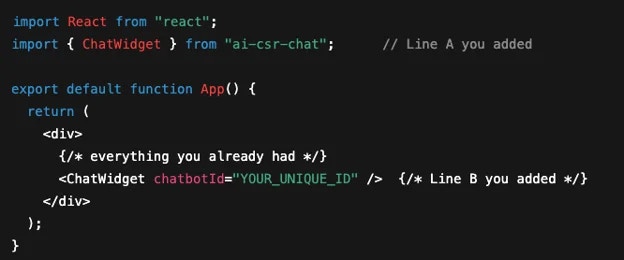 **Step 6.** Save the file and run the site the usual way.
* If you normally click a Run / Start / Deploy button, do that.
* When the site reloads in your browser, you should see a little chat bubble (the Chat Agent) in the corner. That means success!
***
## **WordPress**
***Recommended (Plugin Method):***
**Step 1.** Go to WordPress admin → Plugins → **Add New**.
**Step 2.** Search and install: **Insert Headers & Footers** plugin.\
\
**Step 3.** Go to **Settings → Insert Headers & Footers → Scripts in Footer**.
**Step 4.** Paste your snippet → **Save**.
**Step 5.** Open your site and hard-refresh (CTRL + F5 on Windows, Command + Shift + R on Mac)
**Step 6.** If you see the chat icon in the corner, that means success!
***Alternative (Theme Editor Method):***
**Step 1.** Go to Appearance → Theme File Editor → **footer.php** (before ``)
**Step 2.** Paste the snippet directly there.
**Step 3.** Open your site and hard-refresh (CTRL + F5 on Windows, Command + Shift + R on Mac)
**Step 4.** If you see the chat icon in the corner, that means success!
***
## **Shopify**
**Step 1.** In Shopify admin, navigate to: **Online Store → Themes → Actions (...) → Edit Code**.
**Step 2.** Open layout/theme.liquid.
**Step 3.** Paste your snippet just above ``
**Step 4.** Hit **Save**.
**Step 5.** Open your site and hard-refresh (CTRL + F5 on Windows, Command + Shift + R on Mac)
**Step 6.** If you see the chat icon in the corner, that means success!
***
## **Wix / Squarespace / Ghost**
Step 1. Go to Settings → **Custom Code / Code Injection**.
Step 2. Paste your snippet into the **Footer Code** area.
Step 3. Save or Publish changes.
Step 4. Open your site and hard-refresh (CTRL + F5 on Windows, Command + Shift + R on Mac)
Step 5. If you see the chat icon in the corner, that means success!
***
## **Webflow**
**Step 1.** Go to **Project Settings → Custom Code**.
**Step 2.** Paste your snippet into the **Footer Code** box.
**Step 3. Save** and click **Publish**.
**Step 4.** Open your site and hard-refresh (CTRL + F5 on Windows, Command + Shift + R on Mac)
**Step 5.** If you see the chat icon in the corner, that means success!
***
## **Framer**
**Step 1.** In Framer, open your **Project** → **Settings → General → Custom Code**.
**Step 2.** Copy your custom HTML snippet from Central **Chats › Integrations › Website:** [**https://app.central.com/chats/integrations?provider=website**](https://app.central.com/chats/integrations?provider=website)
**Step 6.** Save the file and run the site the usual way.
* If you normally click a Run / Start / Deploy button, do that.
* When the site reloads in your browser, you should see a little chat bubble (the Chat Agent) in the corner. That means success!
***
## **WordPress**
***Recommended (Plugin Method):***
**Step 1.** Go to WordPress admin → Plugins → **Add New**.
**Step 2.** Search and install: **Insert Headers & Footers** plugin.\
\
**Step 3.** Go to **Settings → Insert Headers & Footers → Scripts in Footer**.
**Step 4.** Paste your snippet → **Save**.
**Step 5.** Open your site and hard-refresh (CTRL + F5 on Windows, Command + Shift + R on Mac)
**Step 6.** If you see the chat icon in the corner, that means success!
***Alternative (Theme Editor Method):***
**Step 1.** Go to Appearance → Theme File Editor → **footer.php** (before ``)
**Step 2.** Paste the snippet directly there.
**Step 3.** Open your site and hard-refresh (CTRL + F5 on Windows, Command + Shift + R on Mac)
**Step 4.** If you see the chat icon in the corner, that means success!
***
## **Shopify**
**Step 1.** In Shopify admin, navigate to: **Online Store → Themes → Actions (...) → Edit Code**.
**Step 2.** Open layout/theme.liquid.
**Step 3.** Paste your snippet just above ``
**Step 4.** Hit **Save**.
**Step 5.** Open your site and hard-refresh (CTRL + F5 on Windows, Command + Shift + R on Mac)
**Step 6.** If you see the chat icon in the corner, that means success!
***
## **Wix / Squarespace / Ghost**
Step 1. Go to Settings → **Custom Code / Code Injection**.
Step 2. Paste your snippet into the **Footer Code** area.
Step 3. Save or Publish changes.
Step 4. Open your site and hard-refresh (CTRL + F5 on Windows, Command + Shift + R on Mac)
Step 5. If you see the chat icon in the corner, that means success!
***
## **Webflow**
**Step 1.** Go to **Project Settings → Custom Code**.
**Step 2.** Paste your snippet into the **Footer Code** box.
**Step 3. Save** and click **Publish**.
**Step 4.** Open your site and hard-refresh (CTRL + F5 on Windows, Command + Shift + R on Mac)
**Step 5.** If you see the chat icon in the corner, that means success!
***
## **Framer**
**Step 1.** In Framer, open your **Project** → **Settings → General → Custom Code**.
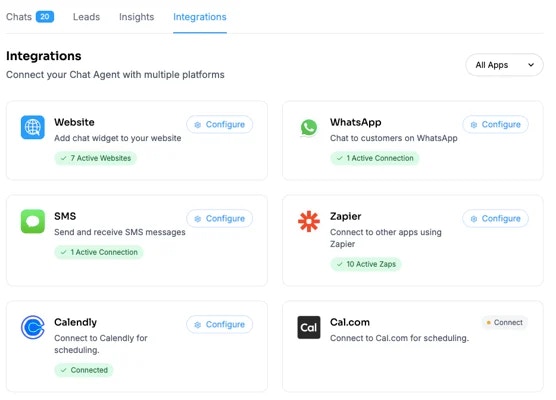
**Step 2.** Copy your custom HTML snippet from Central **Chats › Integrations › Website:** [**https://app.central.com/chats/integrations?provider=website**](https://app.central.com/chats/integrations?provider=website)
 **Step 3.** Paste the snippet into the **End of \** **tag** area.
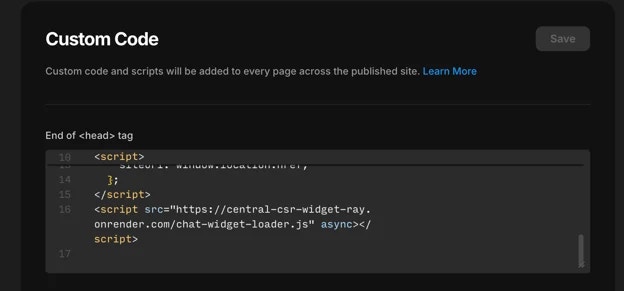 **Step 4.** Make sure to hit **Save** and then **Publish** it.
**Step 5.** Open your site and hard-refresh (CTRL + F5 on Windows, Command + Shift + R on Mac)
**Step 6.** If you see the chat icon in the corner, that means success!
**Step 4.** Make sure to hit **Save** and then **Publish** it.
**Step 5.** Open your site and hard-refresh (CTRL + F5 on Windows, Command + Shift + R on Mac)
**Step 6.** If you see the chat icon in the corner, that means success!
**.
**Step 4.** Save, upload changes, and refresh your website.
**Step 5.** Open your site and hard-refresh.
**Step 6.** If you see the chat icon in the corner, that means success! ✅
***
## **React / Next.js / CRA / Vite**
**Step 1.** Open the file that controls every page.
* Usually called **App.js** or **App.jsx** inside a folder named **src**.
* If you see pages/\_app.js (Next.js sites), that’s the one.
**Step 2.** Copy this and paste it on the first empty line of the file:
* `import ChatWidget from "ai-csr-chat"; // ← keeps its original name`
**Step 3.** Now, find your React Application snippet from **Central AI → Chats → Integrations → Website → Select the chat agent you want to embed → choose ‘React’** and scroll down near the bottom of the same file from Step 1: [https://app.central.com/chats/integrations?provider=website](https://app.central.com/chats/integrations?provider=website)