
.svg?fit=max&auto=format&n=FHWUZ-j-Whe1NQ6e&q=85&s=b9f442f2722868300bf4a6efaf0c56f6)
This guide is for embedding the Central AI Chat Agent into websites and web apps.
For mobile app integration (iOS/Android), please use a WebView or contact support.
For mobile app integration (iOS/Android), please use a WebView or contact support.
- Plain HTML / Custom CMS
- React / Next.js / CRA / Vite
- WordPress
- Shopify
- Wix / Squarespace / Ghost
- Webflow
- Framer
Plain HTML / Custom CMS
Step 1. Locate the page where you’d like to install the chatbot.Or, locate a common file that is present in all pages (e.g. header.html, footer.html, footer.html, menu.html, etc.) if you want the chat agent to be present in every single page. Step 2. Copy your custom HTML snippet from Chats > Integrations > Website : https://app.trycentral.com/chats/integrations?provider=website

React / Next.js / CRA / Vite
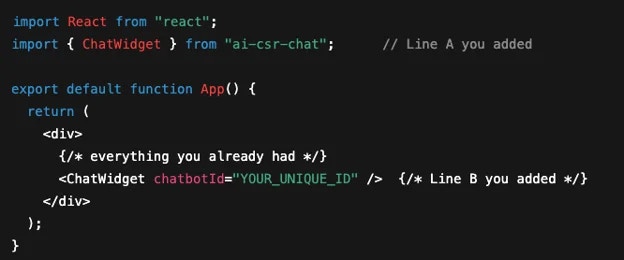
Step 1. Open the file that controls every page.- Usually called App.js or App.jsx inside a folder named src.
- If you see pages/_app.js (Next.js sites), that’s the one.
import ChatWidget from "ai-csr-chat"; // ← keeps its original name

</div> or </> and paste this line from your snippet right above it:
<ChatWidget chatbotId="YOUR_UNIQUE_ID" />
Step 5. Your file will now look roughly like this (don’t worry about the details):
- If you normally click a Run / Start / Deploy button, do that.
- When the site reloads in your browser, you should see a little chat bubble (the Chat Agent) in the corner. That means success!
WordPress
Recommended (Plugin Method): Step 1. Go to WordPress admin → Plugins → Add New. Step 2. Search and install: Insert Headers & Footers plugin.Step 3. Go to Settings → Insert Headers & Footers → Scripts in Footer. Step 4. Paste your snippet → Save. Step 5. Open your site and hard-refresh (CTRL + F5 on Windows, Command + Shift + R on Mac) Step 6. If you see the chat icon in the corner, that means success! Alternative (Theme Editor Method): Step 1. Go to Appearance → Theme File Editor → footer.php (before
</body>)
Step 2. Paste the snippet directly there.
Step 3. Open your site and hard-refresh (CTRL + F5 on Windows, Command + Shift + R on Mac)
Step 4. If you see the chat icon in the corner, that means success!
Shopify
Step 1. In Shopify admin, navigate to: Online Store → Themes → Actions (…) → Edit Code. Step 2. Open layout/theme.liquid. Step 3. Paste your snippet just above</body>
Step 4. Hit Save.
Step 5. Open your site and hard-refresh (CTRL + F5 on Windows, Command + Shift + R on Mac)
Step 6. If you see the chat icon in the corner, that means success!
Wix / Squarespace / Ghost
Step 1. Go to Settings → Custom Code / Code Injection. Step 2. Paste your snippet into the Footer Code area. Step 3. Save or Publish changes. Step 4. Open your site and hard-refresh (CTRL + F5 on Windows, Command + Shift + R on Mac) Step 5. If you see the chat icon in the corner, that means success!Webflow
Step 1. Go to Project Settings → Custom Code. Step 2. Paste your snippet into the Footer Code box. Step 3. Save and click Publish. Step 4. Open your site and hard-refresh (CTRL + F5 on Windows, Command + Shift + R on Mac) Step 5. If you see the chat icon in the corner, that means success!Framer
Step 1. In Framer, open your Project → Settings → General → Custom Code. Step 2. Copy your custom HTML snippet from Central Chats › Integrations › Website: https://app.central.com/chats/integrations?provider=website
